Software in the Loop Joystick Flight
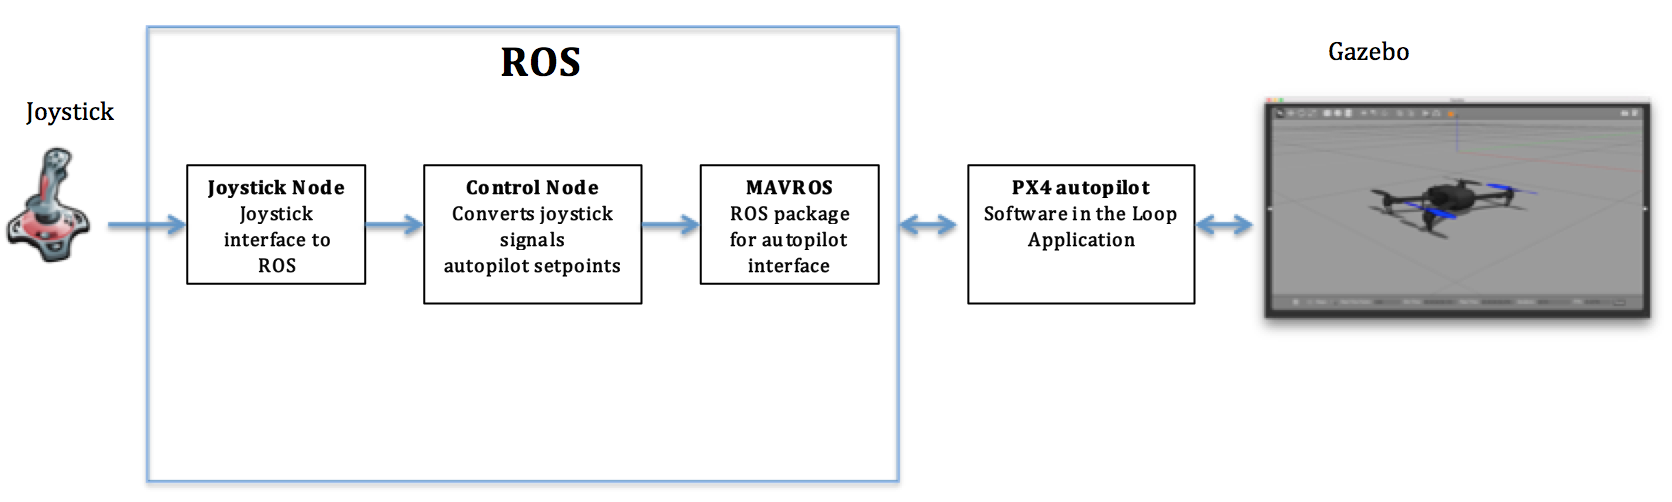
This tutorial explains the steps required to fly a simulated quadcopter in the Gazebo simulator using a real joystick. The following diagram shows how the system components work together.
Hardware Requirements
- Desktop Linux Machine with minimum of 8GB RAM, 16GB recommended, Ubuntu 20.04 installed
- Joystick
Software Requirements
- Ubuntu 20.04
- ROS Noetic (full desktop installation)
- Gazebo: will be automatically installed with ROS
- PX4 firmware installation on Linux: Autopilot software which includes the software-in-the-loop firmware
- MAVROS package: Autopilot ROS interface
- Joy package: Joystick ROS interface
Note
In this tutorial, it is assumed that the reader is familiar with basic Linux commands, ROS Basics.
PX4 SITL with Gazebo System setup
Follow the steps from the video. This will install PX4 firmware and it’s dependencies on your computer and build it.
Launching Gazebo with ROS Wrappers
Now, you are ready to launch Gazebo + PX4 SITL app + ROS + MAVROS. To do that, execute the following command.
roslaunch px4 mavros_posix_sitl.launch
You should be able to see /mavros topics using rostopic list in a new terminal. Also if you execute rosnode list in a new terminal, you should see following
$ rosnode list
/gazebo
/gazebo_gui
/mavros
/rosout
To double check that MAVROS node is connected properly to the PX4 SITL app, try to echo some topics _e.g._
rostopic echo /mavros/state
Which will show if the mavros node is connected to the PX4 SITL app or not.
Now, you can monitor the drone’s states and control it via a MAVROS node.
- As mentioned, in this tutorial, we are going to learn one basic way of controlling the quadcopter’s position via a joystick.
- There is a flight mode in PX4 autopilot which is called OFFBOARD mode. This mode allows the autopilot to accept specific external commands such as position, velocity, and attitude setpoints. You cannot mix between different setpoints _e.g._ velocity setpoints in x/y and position in z.
- A MAVROS node provides setpoint plugins which will listen to a user input on specific setpoint topics. Once the user publishes to those specific setpoint topics, the mavros node will transfer those setpoints to the autopilot to execute.
- If the autopilot’s flight mode is OFFBOARD, the autopilot will accept the received setpoints and execute them.
- We will send position setpoints to the autopilot via a setpoint topic that is available in MAVROS. Once set points are received in that topic, the mavros node will send it to the autopilot.
- The setpoint topic that we will use in this tutorial is
/mavros/setpoint_raw/local. This topic accepts both position and velocity setpoints according to a specific flag. Next, we will create our custom simple ROS package in which we create a simple ROS node that listens to joystic commands from a ROS topic. Then, it will convert joystic commands to position setpoints which will be published to the/mavros/setpoint_raw/localtopic. Finally, MAVROS will take the position set points and send them to the autopilot.
You might be asking, how are we going to get the joystick commands? The next section explains that.
Joystick Package Installation & Usage
A package named joy is going to be used to interface a joystick to ROS. To install that package, simply execute the following command in the terminal.
sudo apt-get install ros-kinetic-joy
You will need to setup permissions before you can use your joystick.
- Plug a joystick
- Check if Linux recognizes your joystick
ls /dev/input/
You will get an output similar to the following.
by-id    event0  event2  event4  event6  event8  mouse0  mouse2  uinput
by-path  event1  event3  event5  event7  js0     mice    mouse1
As you can see, the joystick device is referred to as jsX where X is the number of the joystick device.
Let’s make the joystick accessible to the joy ROS node.
ls -l /dev/input/jsX
You will see something similar to:
crw-rw-XX- 1 root dialout 188, 0 2009-08-14 12:04 /dev/input/jsX
If XX is rw: the js device is configured properly. If XX is --: the js device is not configured properly and you need to:
sudo chmod a+rw /dev/input/jsX
Test the joy node. First, start roscore in a terminal. In another terminal,
# set the joystick device address
rosparam set joy_node/dev "/dev/input/js0"
# run the joy node
rosrun joy joy_node
In another terminal, echo the joy topic and move the joystick to see the topic changes
rostopic echo /joy
You should see an output similar to the following.
header:
seq: 699
stamp:
  secs: 1505985329
  nsecs: 399636113
frame_id: ''
axes: [-0.0, -0.0, -0.8263657689094543]
buttons: [0, 0, 0, 0, 0, 0, 0, 0, 0, 0, 0]
Now, let’s write a custom node that reads joystick’s commands and convert them to position setpoints to control the quadcopter’s poisiton in Gazebo.
Custom Setpoint Node
Now, it’s time for some coding! You will write a ROS node in Python that listens to the /joy topic that is published by the joy node, and converts the joystick commands to xyz position setpoints. Then, it will publish the calculated position setpoints into /mavros/setpoint_raw/local
Publishing to /mavros/setpoint_raw/local topic is not enough to get the autopilot to track the setpoints. It has to be in OFFBOARD mode. So, in your custom node, you will have to send a signal to activate this mode, only once. You need to remember that for this mode to work, you will need to be publishing setpoints beforehand, then, activate it, and continue publishing setpoints. If you don’t publish setpoints at more than 2Hz, it will go into a failsafe mode.
First, create your custom ROS package. The code is commented so you can get an idea of what each part does. Go through code and try to understand it! The python script and launch file are not complete, so you need to add some lines of code where needed.
cd ~/catkin_ws/src
catkin_create_pkg mypackage std_msgs mavros_msgs roscpp rospy
cd mypackage
# usually python scripts (nodes) are placed in a folder called scripts
mkdir scripts
cd scripts
wget https://raw.githubusercontent.com/risckaust/risc-documentations/master/src/gazebo-flight/setpoints_node.py
Make the python file an executable,
chmod +x setpoints_node.py
Make a launch folder. We will create a ROS launch file to run everything at once. Open the launch file and understand what every line executes.
cd ~/catkin_ws/src/mypackage
mkdir launch
cd launch
wget https://raw.githubusercontent.com/risckaust/risc-documentations/master/src/gazebo-flight/joystick_flight.launch
In a fresh terminal, you can run the launch file by executing
roslaunch mypackage joystick_flight.launch
Now, you should see a quadcopter in Gazebo flying at a fixed height and responding to your joystick commands.
Warning
Always make sure that you have joystick permissions configured properly.