Appendix: RISC AUV System Manual
Details of RISC AUV system is discussed here, including the structure of simulation system, hardware system, localization systems, all ROS software packages with illustration, the network structure of the system and everything related.
ROS/Gazebo simulation system manual
Main functions and operating manual of simulation system is in this section.
MultiROV
MultiROV contains game-theoretical algorithm, protocols to communicate with ROS environment, and other essential software components. It is created based on the principle of separating algorithm parts and ROS parts so that each part can be modified individually. Note that there are two branches in this repository. The master branch is for the simulator, and the BlueROV branch is for the hardware test. However, BlueROV branch is written more cleanly and abandoned many parts that are not necessary. So I recommend using BlueROV branch for both simulation and hardware. The user can refer to commit history of this repository for detailed development process as I have clear notes while creating this project for future reference.
It’s class diagram is shown as below.
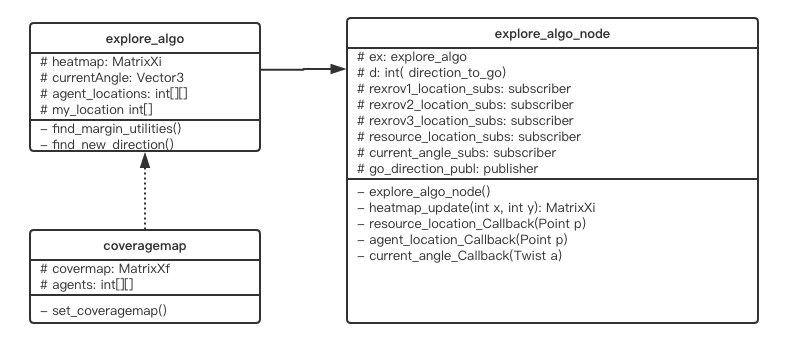
[class_simulation]
Note that only important members and methods of the classes are presented. Here are three main components:
- explore_algo class is the high-level algorithm class, deciding for an agent with local information of resources and other agents. It builds a heatmap with local resources and a coveragemap( not working as a class member but a local variable inside a method) with visible local agents. Last two steps of its computation are listed in its methods in the class diagram。
- coveragemap class builds the nearby coverage status for an agent with
local information of other agents. Methods include
- set_coveragemap(): based on nearby agents to compute coverage status
- explore_algo_node class has explore_algo as its member to high level
algorithmic computations. Other subscribers are used to subscribe
resource locations, agent locations and current direction from Gazebo
topics. Publisher is used to publish computed command to a controller
node to send incremental control service for simulation and
controller node for hardware case. Important methods include:
- heatmap_update(): function needed for resource_location_Callback(), update local heatmap of member ex with locations of sensed resources. Note static resource hardcoded at (3,4) here but still keeps secret for the agent when it’s out of the sensory range.
- resource_location_Callback(): triggered once resource location is received from Gazebo/other outside nodes. Update heatmap in ex.
- agent_location_Callback(): triggered once agent location is received from Gazebo/other outside nodes. Will execute algorithm and send command the controller, either in simulation or in hardware.
- current_angle_Callback(): triggered once current is changed and related topic is publishing. Will modify a parameter in ex to change the utility computation.
UUV simulator
UUV simulator as mentioned before is an open source software package to simulate underwater robots and its working environments. As it’s a big complicated package, we will only discuss some issues when using its related parts. Notice this package is modified by me so please use the version at https://github.com/luym11/uuv_simulator as it’s the version in RISC marine workstation. Also, there are some pre-requirement software packages for installing this package, they are installed correctly on RISC marine workstation. There will be some instructions about this in the last part of this appendix.
We will structure this part with ROS nodes need to run and related explanation. Then we will draw a ROS node graph as Fig[simulation_nodes] to show the relation between these components.
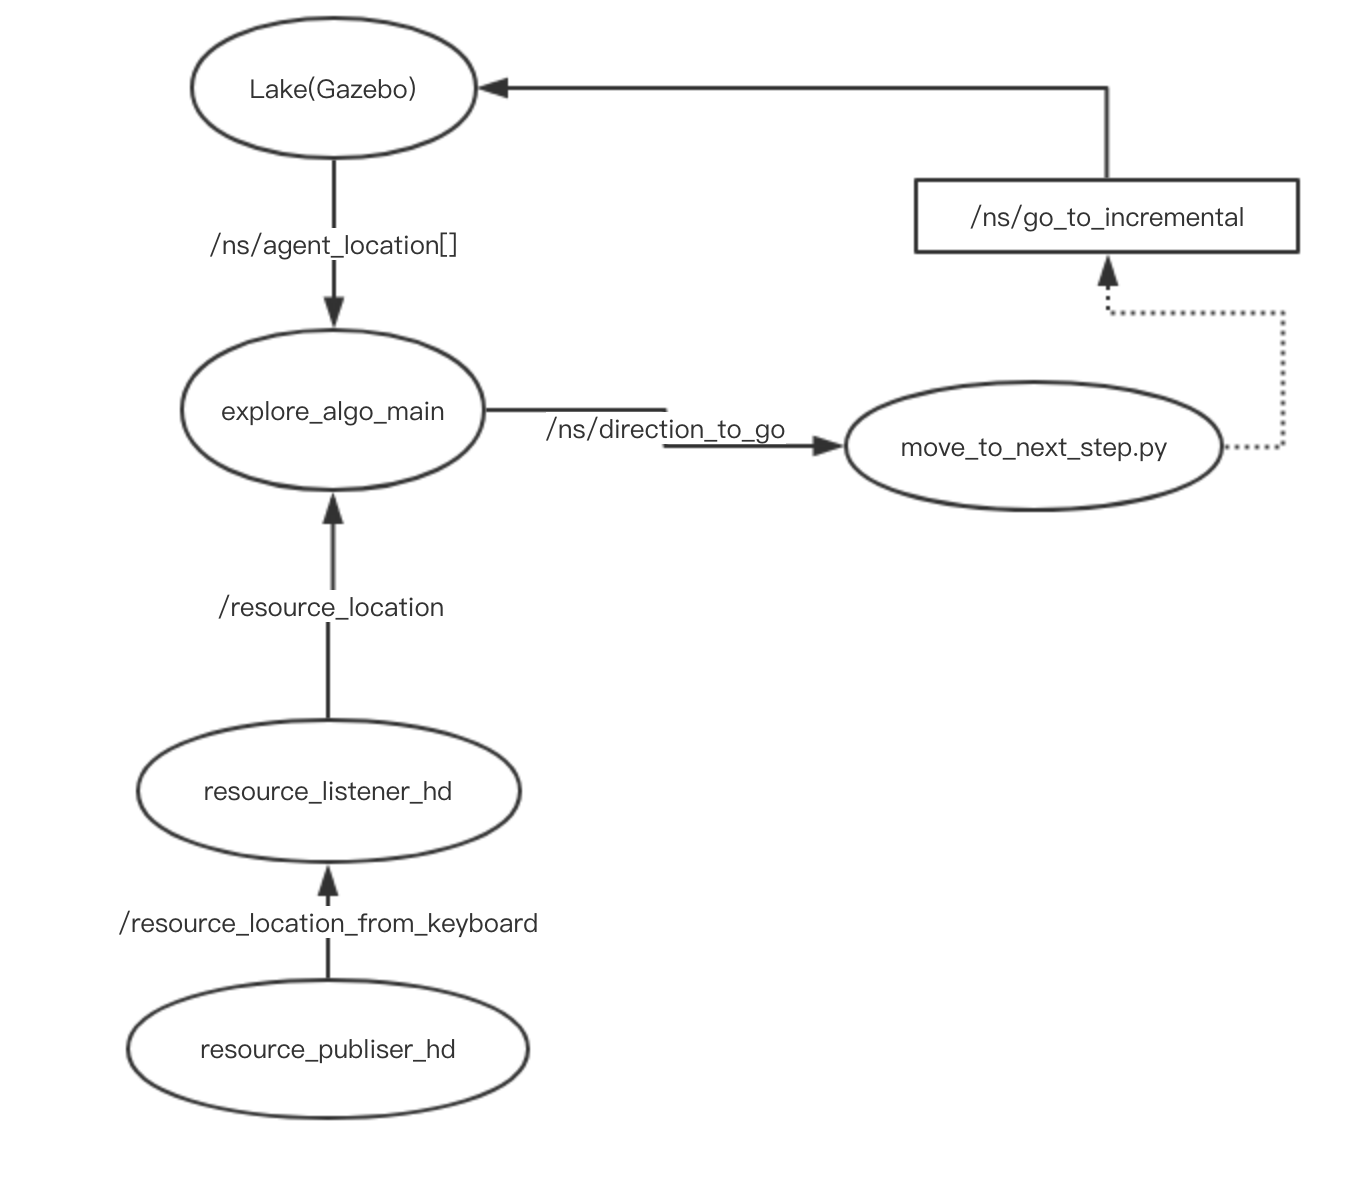
[simulation_nodes]
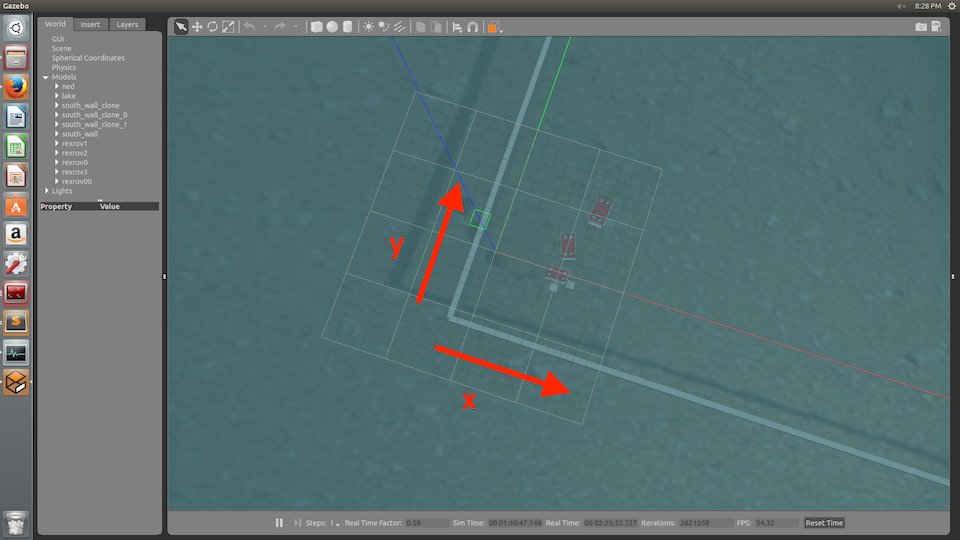
roslaunch multirov lake.launch: This launch file loads Gazebo world, it’s appearance and simulated time. After loading this file, Gazebo environment will be open. Note that x and y axes are already set in Gazebo, we also use walls to indicate that as [rov_multi].
[rov_multi]
roslaunch multiagent_simulation multiagent.launch: this file loads AUV models, resource models and corresponding controllers. RViz can also be loaded from here. In details, we launched (in terms of namespace)
- rexrov1, 2,3: spawn robot model in Gazebo; publish its states to Gazebo; publish its position to ROS topic( using agent_listener node running with it); simulated dp controller.
- rexrov0: spawn resource model in Gazebo( originally at (5,5)); publish its states to Gazebo; joystick node to control it (notice agent_listener is not here because the code for resource was developed earlier and used another method for publishing the location).
- rexrov00: spawn resource model in Gazebo( static at (3,4)); publish its states to Gazebo.
rosrun multirov resource_publisher_hd: let the movable resource controlled by publishing to the topic resource_location_from_keyboard. The way to change resource location is
rostopic pub /resource_location_from_keoard geometry_msgs/Point
"x: 4.0 y: 4.0 z: -30.0" -r 1
and different from the joystick that can also change the location of the movable resource, this change with a keyboard is instant.rosrun multirov resource_listener_hd_node: subscribe from above publised topic and republish to the topic resource_location. Our previous method was a more complicated way of implementing agent_listener node by subscribing rexrov0/base_stabilzed and republish to our own topic resource_location. Now we move to this method for compatibility because in hardware phase we can’t get positions from Gazebo neither the existence of related topics. For vehicles they can be localized by our method, for virtual targets, this is the best way to write this so that it can be used both in simulation and hardware. More details can be found in commit comments in BlueROV branch.
roslaunch multirov explore_environment.launch for three vehicles: Executes previous mentioned node explore_algo_node_main and a incremental controller which calls the service ns/go_to_incremental.
Also, this package supports useful topics and services, for example:
- Add current: rosservice call /hydrodynamics/set_current_velocity “velocity: 1.0 horizontal_angle: 1.7 vertical_angle: 0.0” and this will be published to related topics as if the ROVs have sensor to sense it.
- go_to service: command the vehicle to a specific position in Gazebo.
Hardware system manual
In this section, we will discuss the hardware implementation phase of this project. As this system consists of many parts, we will talk about them separately.
BlueROV
Kit Assembly and common issues
Please refer to their official website for assembly while noticing following points:
- It’s recommended to test each ESC and motor before sealing the enclosure. It will be very hard to change any of them if the ROV is fully assembled.
- Fathom-X Topside board always needs to be powered by Mini USB, or it will not work.
- Organize the tether wire cleanly and don’t let it twist when doing experiments, or much time will be wasted on untangling them.
- When opening the enclosure, remember to remove the penetrator first; when closing the enclosure, remember to close the penetrator after closing the cap. It’s for water proof sealing purpose.
- Use 7.0Ah, 14.8V batteries in the lab as they last much longer than the others.
- Do a vacuum test every time before submerging.
- Motor direction can be reconfigured through QGroundControl software and don’t need to change its wires on hardware.
Network setup and companion computer
Here we are using Fathom-X to extend the ethernet longer and communicate with the Raspberry Pi inside the BlueROV. BlueROV originally comes with a companion Raspberry Pi with a system image that only allows joystick control through QGroundControl ground station, which is not what we desire. So we reimaged the Raspberry Pi with an Ubuntu Mate system, then installed related software packages there, including ROS Kinetic and BlueROV ROS package (modified) from https://github.com/luym11/bluerov-ros-pkg.
We mainly use two parts of this package. For BlueROVs, we will launch bluerov bluerov_r1.launch locally, which loads state publisher, MavROS that talks to ArduSub firmware, imu and camera equipped on the ROV. For controller from ROS via MavROS (both joystick and codes), we launch bluerov_apps teleop_f310.launch on ROS master machine because it needs a joystick for emergency operation, change of mode, arm/disarm, etc. This modified controller node can additionally take direction_to_go as input from ROS topic and control the ROV to go towards that direction with a pre-set speed by publishing to rc_override topic as the joystick does. Note this also means we can directly publish to this topic to control the ROV from the command line.
Note that for some version of ArduSub firmware, the ROV can not take commands from MavROS. For now only ROV1 associated with IP 192.168.0.111 has the correct version of firmware. This will be checked further.
For hardware basic testing, we have a water tank in RISC lab. To use it, please use the mountain climbing rope attached to both the ROV and the beam on top of the tank in case it sinks. Normally testing operation can be done by only one person as the ROV will automatically float on the surface when disarmed.
Instead of the network configuration used in their manual which can only control one ROV at a time, network interfaces of them are reconfigured and connected to RISC marine router with pre-assigned static IP addresses. Note that we will connect all the devices through this RISC marine router with static IP address. A detailed list will be included in the last part.
Raspberry Pi OS image (software packages configured) used here is stored in RISC Google Drive, after flashing, remember to change
- .bashrc for ROS_IP and ROS_MASTER
- interfaces in etc folder for IP address
- bluerov1.launch for ground station IP and target number which is used in accessing multiple ROVs from QGroundControl
Localization system
As mentioned before, a localization system is essential for both knowing the positions of agents and resources. Also it’s needed for waypoint feedback control of the ROVs. We will introduce two methods we have so far.
Tritech USBL
For USBL method, we use Tritech USBL devices. Transponders will be installed on ROV as shown in Fig[serial] and powered from the battery there. Transceiver is powered by it base controlled by software on windows machine and data will be transferred to ROS master PC from serial port. Related ROS package is at https://github.com/luym11/RISCusbl. So the overall architecture is shown in Fig[usbl_archi].

[usbl_archi]
When using this system, please use the specifically made serial port reader as Fig[usbl_on_rov] for its voltage level.
[usbl_on_rov]
Vision-based system
As the defects of USBL system mentioned before, we finally used a vision-based method for this stage of hardware test. Here we chose to use Apriltags to mark the ROVs and use a fisheye camera with related packages to give relative locations of each marker. Then we use a ROS node called location_bridge to publish these locations to agent_locations[ ] topics as we did for Gazebo, thus close the control loop.
First, we need to choose a proper camera and calibrate it. After testing different kinds of camera, we finally chose the fisheye camera and calibrated it using a ROS camera calibration package. This localization system is installed on a DJI matrice 100, with an on-board computer as shown in Fig[dji_top] and Fig[dji_down].

[dji_top]

[dji_down]
Then package at https://github.com/luym11/apriltags2_ros is used to detect markers. Test indoor and outdoor showed its good performance as shown in Fig[marker_out].

[marker_out]
We used Odroid with WiFi communication to RISC marine router to send detected locations to ROS master computer. Three software components are running on the odroid:
- The USB camera node to publish camera image camera
- image_proc package to do image rectification
- Detection code that gives relative location of each marker to the center of the camera
The odroid image is also stored in RISC Google Drive.
The software running on PC is a location_bridge node, remap these coordinates and publish them to agent_locations[ ] topics instead of the Gazebo environment. With this architecture, we can create a closed control loop.
The overall system architecture is shown in Fig[ros_hard]

[ros_hard]
All the commands need to run for one robot open-loop test with this set up are as follows, note the algorithm part is not included in the test now, but as we have the localization system, there is not too much work to close the loop as the architecture graph shows.
- On ROS master machine
roscore
roslaunch bluerov_apps teleop_f310.launch
rosrun image_view image_view image:=/tag_detections_image: to
monitor the view of the camera
- On Odroid
roslaunch apriltags2_ros rov.launch
- On BlueROV
roslaunch bluerov bluerov_r1.launch
So the network architecture of this system is Fig[network]

Others
Data recording and representation
It’s recommended to use rosbag and rqt_multiplot to record and represent data, respectively.
list of software packages and OS images
Software packages
A list of all software packages used (with hyperlinks). They are all host on my account publically on Github. Will be forked to RISC account.
OS images used
- Original OS image for BlueROV (just for archive purpose)
- Ubuntu 16 Mate with ROS, MavROS and BlueROV package: for Raspberry Pi
- Ubuntu 16 Mate with ROS and AprilTag package: for Odroid
Carrying list for outdoor test
As there will always be something forgotten, a list of carryings when going outdoor test is created and maintained.
- School bus key
- DJI Matrice 100, 2 batteries, RC, connection wire with the smartphone, attached Odroid (with WiFi stick and batteries) and camera, attached camera
- Odroid backup: with WiFi, power cable, a camera with USB cable
- Odroid console cable
- SD card reader
- Tapes
- Battery checker
- Ethernet cables
- ruler
- zip ties
- RISC marine router with battery and power cable
- Apriltag markers
- Linux PC (RISC marine laptop)
- ROVs with tether, Fathom-X power cable, ethernet cable, batteries
- Logitech joystick
Equipment list and backups
- Linux ROS Master risc@192.168.0.195, risc
- ROV1 risc@192.168.0.111, risc; gcs target 1
- ROV2 risc@192.168.0.112, risc; gcs target 2
- ROV3 risc@192.168.0.113, risc; gcs target 3
- ROV2 Test Pi with a ArduSub installed Pixhawk risc@192.168.0.112, risc; gcs target 2
- Camera Odroid odroid@192.168.0.190, odroid
- Camera Odroid backup odroid@192.168.0.180, odroid
UUV dependencies troubleshoot
Look at the log, reinstall essential packages, modify CMakeLists. Remember to source the bashrc everytime redo catkin build to make changes really effect.
Eigen 3 issues
- Make a new soft link to src
- modify include_directories(include \({catkin\_INCLUDE\_DIRS}\)Eigen_INCLUDE_DIRS)
Other dependencies
Others
- Some version of firmware doesn’t allow offboard mode. In this situation, if the vehicle still operates with RC commands, it’s mostly through QGroundControl. Notice key settings in these two situations are different.